Some tips on making a 3D Toothless cake.
I used a small circle for the face and then a bigger circle for the body and tail. I cut almost half the big circle off and used some of that for the tail.
Perpare the cakes a few days before and pop them in the freezer. Take them out when you are ready to start. It is much easier to cut the cakes when they are frozen.
I could have taken more off the tail, making it thinner and more round.
Cover with butter icing to help the fondant stick.
I should have let the cake "warm up" a bit. It was still very cold and so the butter icing got very hard on it. In future I will let the cake defrost a bit more and put more butter icing on. This helps you mould it a bit to get the nicest shape.
Roll out a piece of black fondant (I think it's easier to buy black) and cover the whole thing with one piece. Don't worry if there is a bit of a gap in the middle there - the wing and foot will cover that. Put it on "loose" enough so that you can tuck it behind the head.
Cut the fondant a bit away from the bottom of the cake - then fold that bit extra underneath - giving a nice clean edge.
Make little horns and ears. I made little dents in the head to help this sit. The horns just stuck on their own. I used toothpicks into the head to help hold the ears in place.
You can keep little hands busy by getting them to make little dots. It would have been better to have these done right before I needed them (because they dried out a bit before I got to them) but they needed something to do right then (while I got the body and wings sorted).
Rachel helped me by making the little triangle for along his back from rolled fondant. She made them progressively bigger. She used this same cutting tool, made a little cut in the fondant on his back - and then gently placed the triangle into that cut. It was nice and neat and the triangles were light enough to stay up straight.
Roll out some more fondant and cut wings. Make little "sausages" out of fondant to make the ribs. Then use the small ball tool to make little dots. I used this over the tail and lower body too - just to add some texture to his skin.
Attach the sings - putting them on so that they have a bit of shape (not just lying flat).
Make a little foot with toes.
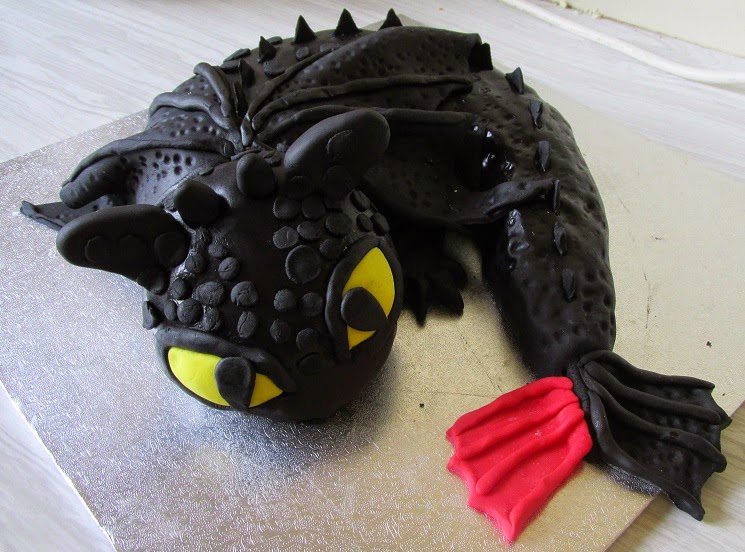
Eyes and tail added and then all the little spots that the children made.
A close up of his face and that little foot. You can also see the triangles along his back nicely here.


2 comments:
Hi Bucklands
I just wanted to thank you for this terrific tutorial. So many of the other online dragon tutorials were frankly intimidating, and whilst my cake was not as professional looking as yours, it thrilled my 9 year old son and his friends.
I was particularly impressed by your tip of freezing the cake first to make carving easier - I never have thought of that! I used a lemon sponge and lemon butter cream icing, which made a welcome fresh counterpart to the cloying sweetness of the fondant icing. I also mounted the cake on a 'landscape' base of rice crispies (a non-negotiable element of birthday parties since I was a child) and put sparklers in Toothless' mouth - yes, I know he doesn't blow flames, but then there are so many discrepancies between the (very good) movies and the (even better) books that I felt no guilt at exercising some poetic licence.
Thanks again for your generous guidance - my daughter and I had huge fun, and you helped to make a little boy's birthday extra special!
Regards
Cathy
Thank you for your lovely comment Cathy. I am so pleased it helped you and you had so much fun with your creation. :-)
Post a Comment